Getting Started with Procreate

Procreate is a powerful digital illustration app that has become a favorite among artists and designers for its intuitive interface and wide range of features. Whether you’re a beginner or a seasoned professional, Procreate offers a variety of tools and brushes to bring your creative vision to life. To get started, simply download the app from the App Store onto your iPad and launch it to begin unleashing your artistic potential.
Once you open Procreate, take some time to explore the different tools and brushes available to you. From pencils and pens to complex digital brushes, Procreate gives you the flexibility to experiment and find the perfect tools for your artistic style. Don’t be afraid to play around with different options to see what works best for you, as mastering these tools is key to creating stunning illustrations in Procreate.
Understanding Procreate Tools and Brushes

When diving into the world of digital art with Procreate, it’s essential to have a good grasp of the various tools and brushes at your disposal. Procreate offers a wide range of tools, from basic drawing tools like pencils and brushes to more advanced tools like smudge tools, erasers, and selection tools. Each tool serves a specific purpose, allowing you to create detailed and intricate illustrations with ease.
Additionally, Procreate provides an extensive collection of brushes that can be customized to suit your unique style and preferences. Whether you prefer realistic textures, watercolor effects, or bold strokes, Procreate’s vast library of brushes has something for every artist. Experimenting with different brushes can help you achieve the desired look and feel for your illustrations, enabling you to unleash your creativity and bring your ideas to life on the digital canvas.
Choosing the Right Canvas Size and Resolution

When starting a new illustration in Procreate, one of the key decisions you’ll need to make is selecting the right canvas size and resolution. The canvas size determines the dimensions of your artwork, while the resolution dictates the quality and sharpness of the final image. It’s important to consider how you plan to use the artwork – whether it’s for print or digital display – as this will influence your choice of canvas size and resolution.
A larger canvas size with a higher resolution is ideal for detailed illustrations that may be printed in large formats. On the other hand, a smaller canvas size with a lower resolution works well for web graphics or designs that don’t require intricate details. Keep in mind that larger canvas sizes with higher resolutions will result in larger file sizes, which may impact the performance of your device. Ultimately, the right canvas size and resolution will depend on the specific requirements of your project and how you intend to showcase your artwork.
Creating a Color Palette for Your Illustration

Understanding how to create a cohesive color palette is essential for bringing harmony and balance to your illustration. Start by selecting a few base colors that will serve as the foundation for your artwork. Consider the mood and emotions you want to evoke, as different colors can convey different feelings to the viewer. Once you have your base colors, experiment with variations and shades to create depth and interest in your illustration.
Utilize the color wheel to explore color relationships and find complementary, analogous, or monochromatic color schemes that resonate with your artistic vision. Pay attention to the contrast between light and dark shades to create visual impact and focal points within your illustration. Remember, a well-thought-out color palette can elevate your artwork and make it more visually compelling to your audience.
Sketching Your Ideas and Concepts

When beginning a new illustration in Procreate, the sketching phase is a crucial step to establish the basic composition and layout of your artwork. Start by using a basic brush to outline the main elements of your illustration, focusing on shapes and proportions. Keep your sketch loose and light to allow for easy adjustments as you refine your ideas and concepts.
Use different layers for each major component of your illustration to maintain organization and flexibility during the sketching process. This will make it easier to make changes without affecting the rest of your artwork. Experiment with different perspectives and compositions to find the most dynamic and visually appealing arrangement for your illustration.
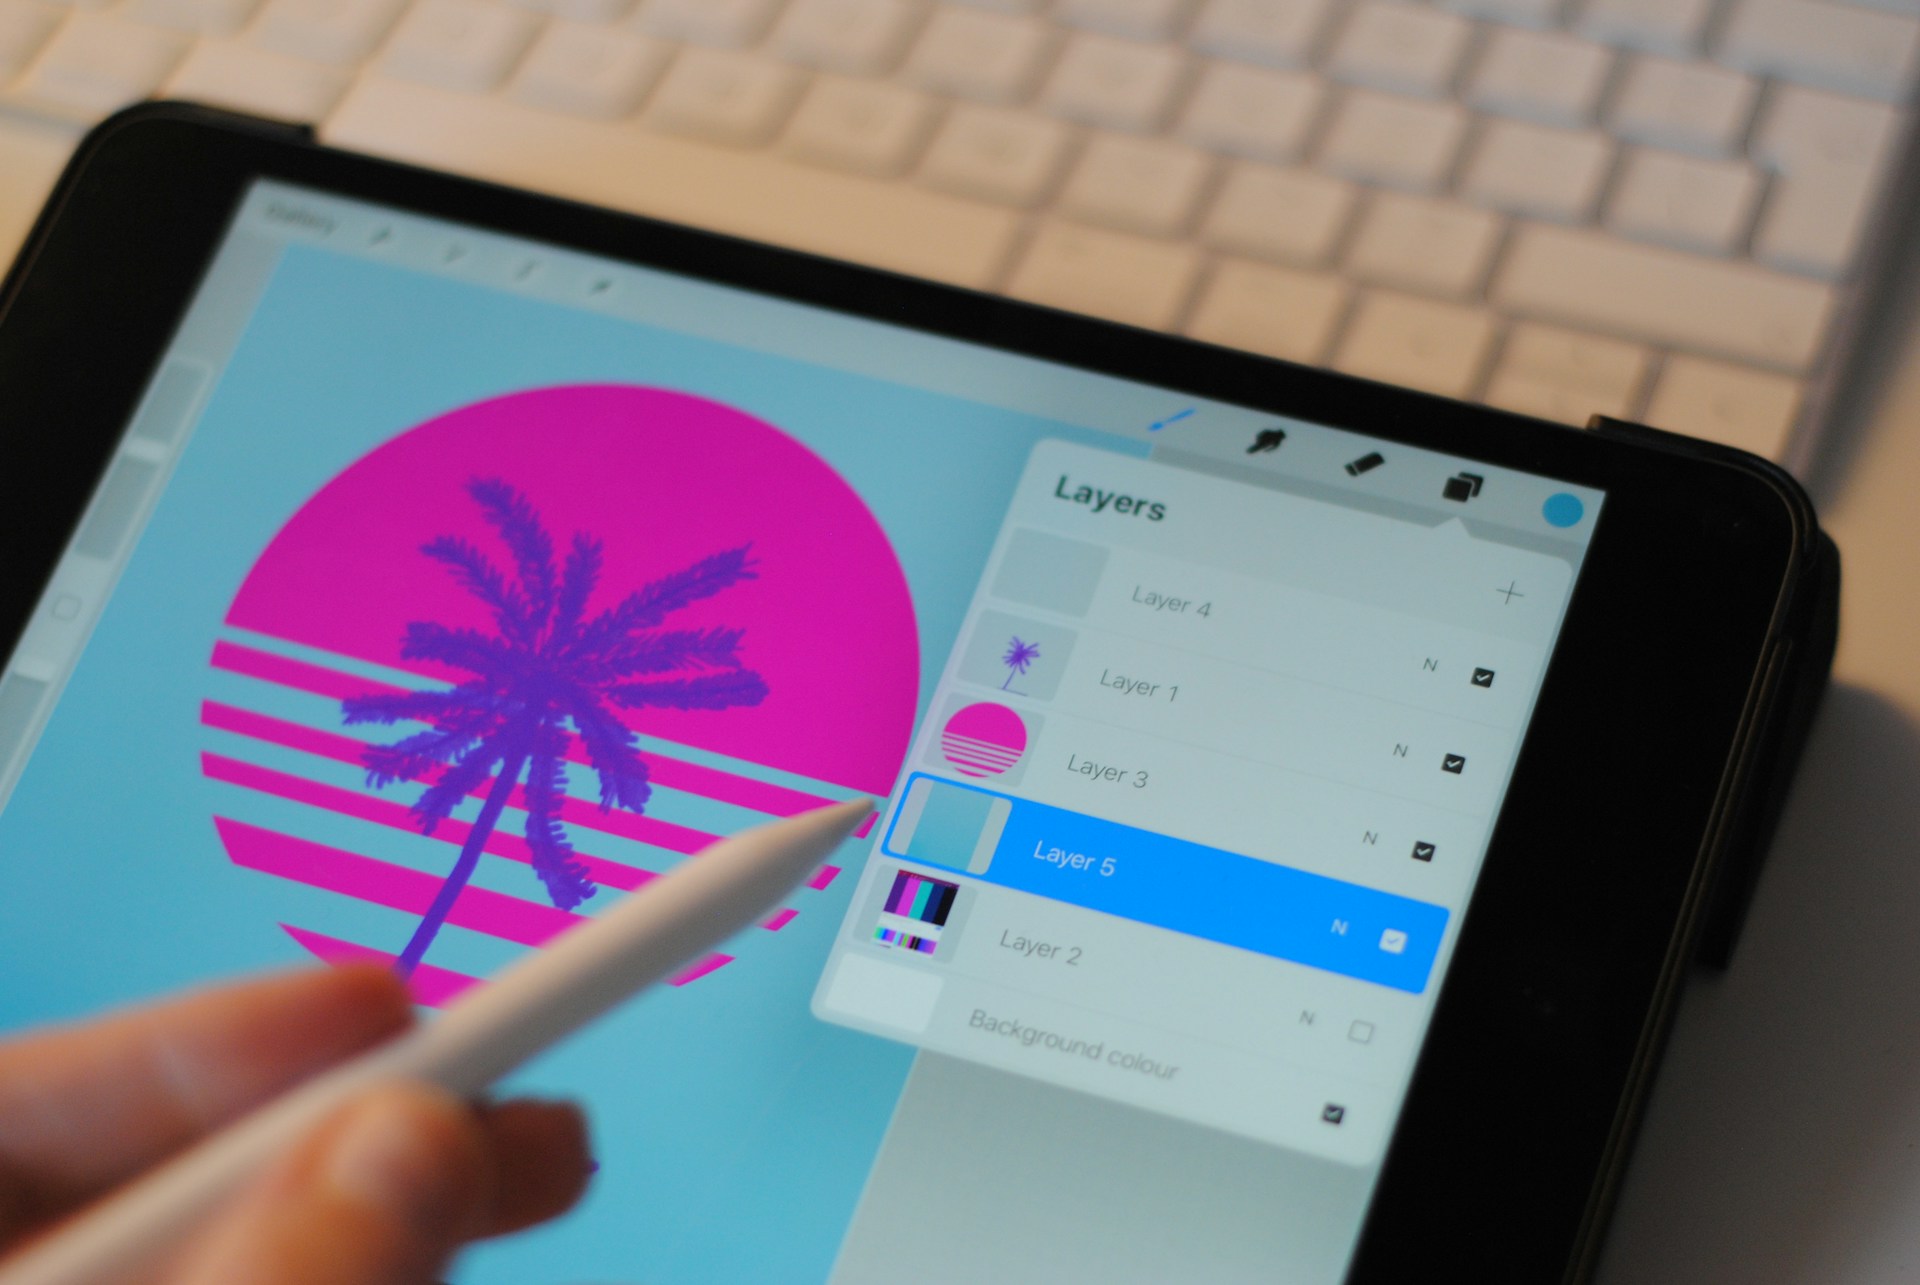
Using Layers to Organize Your Illustration

When working on your illustration in Procreate, utilizing layers is a crucial aspect of organizing your artwork. Layers allow you to separate different elements of your illustration, making it easier to edit and modify specific parts without affecting the rest of the artwork. By creating multiple layers, you can work on different aspects of your illustration individually, such as background, foreground, characters, and details, ensuring a more structured and efficient workflow.
Furthermore, layers in Procreate enable you to adjust the opacity and blending modes of each layer, providing endless possibilities for creating various effects and enhancing the overall look of your illustration. You can also rearrange the order of layers to change the stacking order of elements, allowing you to experiment with different compositions and visual arrangements until you achieve the desired result. By mastering the use of layers, you can take your illustration to the next level and unleash your creativity.
Adding Details and Textures to Your Illustration

To enhance the visual appeal of your illustration, adding details and textures is crucial. Details, such as intricate patterns or fine lines, can bring depth and complexity to your artwork. Experiment with different brush sizes and opacities to create varying levels of detail within your illustration.
Textures add a tactile quality to your digital artwork, making it more visually engaging. Whether you’re aiming for a rough, textured look or a smooth, polished finish, incorporating textures can elevate the overall aesthetic of your illustration. Consider using Procreate’s extensive brush library to explore a wide range of textures, from natural elements like wood and stone to artistic effects like watercolor or oil paint textures.
Experimenting with Different Brush Opacities and Blending Modes

Experimenting with different brush opacities and blending modes can truly elevate the quality and uniqueness of your illustration in Procreate. By adjusting the opacity of your brush, you can create subtle or intense effects that add depth and dimension to your artwork. Blending modes, on the other hand, allow you to blend colors and textures seamlessly, opening up a world of creative possibilities for your digital creations.
When exploring different brush opacities, try varying the opacity as you work on different parts of your illustration to create a sense of light and shadow. Experiment with blending modes to see how they interact with the colors and layers in your artwork, giving it a professional and polished finish. By mastering the art of blending colors and adjusting brush opacities, you can bring your illustrations to life and make them truly stand out.
Utilizing Selection Tools for Precise Editing

When working on your illustration in Procreate, utilizing selection tools can greatly enhance your editing process. The ability to make precise selections allows you to isolate specific areas of your artwork for targeted adjustments. Whether you need to remove a background, adjust colors in a specific area, or apply effects to a selected portion, selection tools offer a level of control that can elevate the quality of your work.
One commonly used selection tool in Procreate is the “Freehand Selection” tool, which enables you to create custom selections by drawing around the desired area. This tool is particularly useful for selecting irregular shapes or fine details in your artwork. Additionally, the “Automatic Selection” tool can quickly select areas based on color or tone, saving you time and effort in the editing process. By mastering these selection tools, you can refine your illustrations with precision and attention to detail.
Adding Depth and Dimension to Your Illustration

To add depth and dimension to your illustration, consider incorporating elements such as shadows, highlights, and perspective. Shadows can create a sense of volume and realistic lighting within your artwork, while highlights can make certain areas pop and catch the viewer’s eye. Experiment with varying levels of opacity and blending modes to achieve the desired effect.
Utilizing techniques like color gradients and layering can also help enhance the sense of depth in your illustration. By strategically placing elements in the foreground, midground, and background, you can create a more immersive and visually engaging piece. Don’t be afraid to play around with different effects and filters to further enhance the dimensionality of your artwork.
Exploring Different Effects and Filters in Procreate

Exploring different effects and filters in Procreate can truly elevate your illustrations to the next level. Procreate offers a wide range of effects and filters that allow you to experiment with various styles and techniques. From adding a vintage feel with the halftone filter to creating a dreamy atmosphere with the bloom effect, there are endless possibilities to explore.
Furthermore, by combining different effects and adjusting their intensity, you can create unique and visually striking compositions. Whether you’re looking to enhance the colors in your artwork or add a dynamic touch with motion blur, Procreate provides a versatile platform for unleashing your creativity. Take the time to play around with the various effects and filters available in Procreate and discover how they can enhance the overall look and feel of your illustrations.
Incorporating Typography into Your Illustration

When it comes to incorporating typography into your illustration, choosing the right font is crucial in conveying the desired message or aesthetic. Experiment with different typefaces and font styles to find one that complements your illustration without overpowering it. Consider the size, spacing, and placement of the text to ensure it integrates seamlessly with the overall composition.
Typography can be used to add context, emphasis, or even serve as a design element within your illustration. Play around with text effects such as shadows, outlines, or gradients to enhance the visual appeal of the typography. Remember to maintain a balance between the text and other elements in your illustration to create a cohesive and visually engaging piece of art.
Using Masks for Non-Destructive Editing

Masks in Procreate are a powerful tool that allows you to make non-destructive edits to your artwork. By using masks, you can hide or reveal parts of your illustration without permanently altering the original pixels. This is especially useful when you want to experiment with different effects or make precise adjustments without worrying about losing the integrity of your work.
To apply a mask in Procreate, simply select the layer you want to mask and tap on the layer thumbnail. Then, choose “Mask” from the menu that appears. You can then use the brush tool to paint in black to hide parts of the layer or white to reveal them. Masks give you the flexibility to fine-tune your edits and make changes at any point in your creative process without fear of damaging your original artwork.
Adding Shadows and Highlights for Realism

To enhance the realism of your illustrations in Procreate, incorporating shadows and highlights is essential. Shadows add depth and dimension to your artwork, creating a sense of realism by depicting how light interacts with objects. By strategically placing shadows, you can make your illustrations appear more three-dimensional and lifelike. Likewise, highlights help to accentuate certain areas of your artwork, attracting the viewer’s eye to specific details and creating a sense of luminosity.
When adding shadows to your illustration, consider the direction of light source to determine where shadows would fall naturally. Experiment with different opacities and blending modes to achieve the desired effect. For highlights, focus on areas that would catch the most light, such as edges or prominent features. By carefully balancing shadows and highlights, you can create a realistic and visually striking composition that engages the viewer’s attention.
Mastering the Art of Color Gradients

Color gradients are a powerful tool in digital art, allowing artists to create smooth transitions between colors and add depth to their illustrations. In Procreate, mastering the art of color gradients can elevate your artworks to a whole new level. By understanding how to blend colors seamlessly and strategically apply gradients, you can achieve stunning visual effects that captivate viewers.
When working with color gradients in Procreate, experiment with different blending modes and opacities to find the perfect balance for your illustration. Start by selecting a base color and then choose complementary or contrasting hues to create a dynamic gradient effect. Remember to pay attention to the direction of the gradient and how it interacts with the overall composition of your artwork. With practice and experimentation, you can master the art of color gradients and use them to enhance the mood and atmosphere of your illustrations.
Creating Custom Brushes in Procreate

To create custom brushes in Procreate, start by opening the Brush Studio and selecting a brush that you wish to modify. Adjust various settings such as shape, size, opacity, and scattering to tailor the brush to your liking. Experiment with different combinations of settings to achieve the desired effect for your artwork.
Additionally, you can import textures or patterns to use as brush stamps by selecting the source in the Brush Studio. This allows you to add unique textures to your brushes, giving your artwork a distinctive look. By customizing brushes in Procreate, you can enhance your illustration style and create original pieces that stand out.
Utilizing Procreate’s Time-lapse Feature for Progress Tracking

Procreate’s time-lapse feature is a valuable tool for artists looking to track their progress and share their creative process. By recording every stroke and edit made during the illustration process, the time-lapse feature offers a fascinating glimpse into the evolution of a piece from start to finish. This visual timeline not only serves as a way to document your artistic journey but also provides insight into your workflow and techniques.
Watching the time-lapse playback can be a rewarding experience, allowing you to reflect on your decision-making process, brushstroke precision, and overall composition. It can be a useful learning tool, as you can identify areas for improvement and celebrate successful techniques. Additionally, sharing the time-lapse video on social media platforms can engage your audience and showcase the dedication and effort that go into creating a digital artwork.
Exporting Your Illustration in Different File Formats

When it comes to wrapping up your masterpiece in Procreate, it is crucial to export your illustration in various file formats to suit different needs. Whether you want to share your artwork online, print it on merchandise, or collaborate with others, having the flexibility to export in different formats is key. Procreate offers a range of options, including JPEG, PNG, PSD, and PDF, allowing you to choose the most appropriate format for your specific requirements. Ensure that you select the right format that preserves the quality and integrity of your artwork when exporting.
Additionally, consider adjusting the resolution and dimensions of your exported file to best showcase your illustration. Depending on the intended use of your artwork, you may need to resize or scale your illustration accordingly. For social media sharing, a lower resolution might suffice, whereas printing your artwork on a large canvas would require a higher resolution file. Take into account the platform or medium where your illustration will be displayed to optimize its visual impact through proper resolution and dimensions.
• Export your illustration in various file formats to suit different needs
• Options include JPEG, PNG, PSD, and PDF in Procreate
• Choose the most appropriate format for specific requirements
• Select the right format that preserves quality and integrity of artwork when exporting
Additionally, consider adjusting the resolution and dimensions of your exported file:
• Resize or scale illustration based on intended use
• Lower resolution for social media sharing
• Higher resolution for printing on large canvas
• Optimize visual impact by considering platform or medium where illustration will be displayed
Sharing Your Artwork on Social Media Platforms

When it comes to showcasing your artwork to a wider audience, social media platforms can be powerful tools. Platforms like Instagram, Facebook, and Twitter provide artists with easy and effective ways to share their creations with the world. By posting your artwork on these platforms, you can reach a larger audience, connect with fellow artists, and gain valuable feedback on your work.
One key aspect of sharing your artwork on social media is to engage with your audience. Responding to comments, participating in art communities, and supporting other artists can help you build a strong online presence and attract more followers. Additionally, using relevant hashtags and posting consistently can help increase visibility and reach a larger audience. By actively engaging with your followers and the art community on social media, you can cultivate a supportive network that can help you grow as an artist.
Seeking Feedback and Critique to Improve Your Skills

Feedback and critique play a crucial role in the growth and improvement of any artist. It is essential to seek constructive criticism from peers, mentors, or even online communities to gain fresh perspectives on your work. Constructive feedback can help you identify areas for improvement, pinpoint strengths in your artwork, and provide valuable insights that can push your skills to the next level.
Engaging with feedback requires an open mind and a willingness to learn and adapt. Remember that receiving critiques is not a personal attack on your artistry but rather an opportunity for growth. Embrace both positive feedback that acknowledges your strengths and constructive criticism that highlights areas needing development. By actively seeking feedback and applying it to your practice, you can refine your skills, expand your creative horizons, and evolve as an artist.